CCB’s Tekno ET48 2.0 Build

This site may earn a commission from merchant affiliate
links, including eBay, Amazon, and others.

CCB-MN

Well-known member
Messages
273
Reaction score
556
Location
MN USA
Corally RC's
  1. Kagama
  2. Kronos XTR
Hey All,

I want to preface this by saying, I suck at taking pictures, my grammar is horrible, my sense of humor is dark and slightly twisted. Between my hectic life, a body that’s taken far too much punishment over the years, my Adult ADD and my crazy dog, this could take hours, this could take days, or even weeks, we wil see.

Tekno ET48 2.0

IMG_3101.jpeg


IMG_3102.jpeg

IMG_3103.jpeg


Hopefully I’ll have some time this afternoon. The adventure begins!
 
(Please understand that I’m not a “Racer”, I’m just a guy that likes rc’s so my opinions are “my opinions” and I’m building this from that vantage point). I will be as fair as I can while I build this kit. If it’s good, I’ll says it’s good. If something sucks, I definitely say that it sucks. But again, only my opinion.


Day 1: Shock and Awe

The build quality is very nice. To be fair, I love kits but I generally build bashers and buy rollers so to me this is really next level. By far, the nicest kit I’ve built. I’ll try share some photos of the sections as I move on, but this is clearly manufactured well.

The instructions are also very nice and easy to understand. Again, far superior to anything I’ve ever built. They are not overly detailed or cluttered but all the important bits are there. If it’s really important, then it’s highlighted. Even better for my old eyes.

IMG_3129.jpeg


IMG_3130.jpeg


Thats enough for today. I’m impressed, can’t wait to see how it goes together. 🙏

Tomorrow, Bag A
 
(Please understand that I’m not a “Racer”, I’m just a guy that likes rc’s so my opinions are “my opinions” and I’m building this from that vantage point). I will be as fair as I can while I build this kit. If it’s good, I’ll says it’s good. If something sucks, I definitely say that it sucks. But again, only my opinion.


Day 1: Shock and Awe

The build quality is very nice. To be fair, I love kits but I generally build bashers and buy rollers so to me this is really next level. By far, the nicest kit I’ve built. I’ll try share some photos of the sections as I move on, but this is clearly manufactured well.

The instructions are also very nice and easy to understand. Again, far superior to anything I’ve ever built. They are not overly detailed or cluttered but all the important bits are there. If it’s really important, then it’s highlighted. Even better for my old eyes.

View attachment 5303

View attachment 5304

Thats enough for today. I’m impressed, can’t wait to see how it goes together. 🙏

Tomorrow, Bag A
nbsIAR9Pc9wMBEshgC.gif


I love build threads - your photos are great and I'm looking forward to this. I so nearly pulled the trigger on one of these - but now we're moving house, so better be good and wait a while. 🤩👍
 
Thanks H! This one is pretty fun so far. Makes it easy with good instructions and parts that fit properly. 🙀
 
Day 2: The Fun Begins

Bag A: Center Differential

IMG_3131.jpeg


Pretty straight forward. They recommend 20k in the cd, so that’s what we will go with!

IMG_3105.jpeg


A little oily residue on some of the parts so I’ll clean them all before assembly.

IMG_3108.jpeg


Everything moves smoothly and nice, just as it should.

IMG_3114.jpeg


Bag A took me 20-30 minutes for this bag as I took my time and really wanted to inspect things. I’ll probably group some sections together moving forward because some sections are very similar.

Next, bags B and C.

✌️
 
Day 2: The Fun Begins

Bag A: Center Differential

View attachment 5320

Pretty straight forward. They recommend 20k in the cd, so that’s what we will go with!

View attachment 5321

A little oily residue on some of the parts so I’ll clean them all before assembly.

View attachment 5322

Everything moves smoothly and nice, just as it should.

View attachment 5323

Bag A took me 20-30 minutes for this bag as I took my time and really wanted to inspect things. I’ll probably group some sections together moving forward because some sections are very similar.

Next, bags B and C.

✌️
As a builder of many, many Tekno kits over the years don't clean the parts. If there's oil in the kit bag it's to prevent oxidation of the parts & most likely will aid assembly! Only time kit parts need attention if the nylon or composite parts have burrs which Tekno quality control usually catches.
 
As a builder of many, many Tekno kits over the years don't clean the parts. If there's oil in the kit bag it's to prevent oxidation of the parts & most likely will aid assembly! Only time kit parts need attention if the nylon or composite parts have burrs which Tekno quality control usually catches.
The oil on the screws going into plastic can be left. However - Any/all screws going into metal parts or grub screws etc have to be degreased - otherwise thread lock won't work and the parts will work loose.

Day 2: The Fun Begins

Bag A: Center Differential

View attachment 5320

Pretty straight forward. They recommend 20k in the cd, so that’s what we will go with!

View attachment 5321

A little oily residue on some of the parts so I’ll clean them all before assembly.

View attachment 5322

Everything moves smoothly and nice, just as it should.

View attachment 5323

Bag A took me 20-30 minutes for this bag as I took my time and really wanted to inspect things. I’ll probably group some sections together moving forward because some sections are very similar.

Next, bags B and C.

✌️
The Tekno manual looks good - closer to Xray standard than Sworkz. It's good to have colour and glossy paper is easy to wipe if you get finger marks on the manual. 🤩

Looking forward to the next installment. 👍
 
The oil on the screws going into plastic can be left. However - Any/all screws going into metal parts or grub screws etc have to be degreased - otherwise thread lock won't work and the parts will work loose.


The Tekno manual looks good - closer to Xray standard than Sworkz. It's good to have colour and glossy paper is easy to wipe if you get finger marks on the manual. 🤩

Looking forward to the next installment. 👍
That was in reference to the diff bag he was assembling. Only the outdrive cups have grub screws that thread lock would be applicable to. So many people put loctite in the wrong places when building Tekno diffs because they're worried about leaks😔😔
 
All good H, 👍 my ADD gets the better of me at times and probably spend a lot of extra time just dicking around and looking at stuff. I’m sure that a skilled builder would fly through this compared to myself, but I’ve got time on my hands and I don’t mind being thorough. lol, too damn cold to go outside today anyway. 🤣

My wife is out with my daughters for most of the day so “Bob” is keeping me company as I build away.
IMG_3128.jpeg
 
Day 2: Fun Continues

Bag B: Front and Rear Differential

IMG_3132.jpeg


Again, super clear and easy instructions.


IMG_3109.jpeg


Everything clearing packaged well.

IMG_3110.jpeg


Quality is 🔥🔥🔥🔥🔥🔥


IMG_3111.jpeg


Look and feel very precise.

IMG_3112.jpeg


I can only imagine that if you put just a little time and maintenance into these rigs, they would really last a long time. Everything is so precise, much more than I had imagined.

IMG_3114.jpeg


Everything was smooooooooooth. Bag B probably took 30 minutes. Agsin, I’m really looking at things as I go for my own benefit and knowledge.

Bag C is next up, maybe after a short break.
 
That was in reference to the diff bag he was assembling. Only the outdrive cups have grub screws that thread lock would be applicable to. So many people put loctite in the wrong places when building Tekno diffs because they're worried about leaks😔😔
Right, understood. And pinion grubscrews. 👍 Yeah, loctite into plastic isn't helpful. 🤣

All good H, 👍 my ADD gets the better of me at times and probably spend a lot of extra time just dicking around and looking at stuff. I’m sure that a skilled builder would fly through this compared to myself, but I’ve got time on my hands and I don’t mind being thorough. lol, too damn cold to go outside today anyway. 🤣

My wife is out with my daughters for most of the day so “Bob” is keeping me company as I build away. View attachment 5325
That scale crawler is awesome. 😎🤩 Send my regards to bob. 😝
 
Day 2: More Fun!

Bag C: Front Gearbox

IMG_3133.jpeg


Great instructions.

IMG_3121.jpeg


Quality is still great!

IMG_3118.jpeg


Nice machining on the tower! 👀👀

IMG_3123.jpeg


Pretty basic gearbox, but everything was nice and easy. I ended up using 1 of the shims although it probably would have been fine without them. Yes, the fit was that good.😊

IMG_3122.jpeg


Bag D is on deck. One more gearbox then the rear end. All the pieces sitting next to me on the bench are just screaming at me to be assembled. Short break, then back at it. 👍👍👍

Yeah, my daughters refer to him as “English Bob” and his little bumblebee! 🐝 
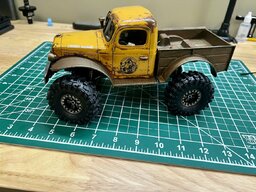
Absolutely no idea why, but it stuck. He’s slowly becoming a little brute. lol, got a little more metal I can put on his ride, but not much! We use the crawlers on rain days when we’re trapped inside.

IMG_3151.jpeg


A little metal and weight distribution!

IMG_3148.jpeg


Stock

IMG_3149.jpeg


Stock

IMG_3147.jpeg


Definitely not stock. 🤣🤣🤣
 

Attachments

  • IMG_3150.jpeg
    IMG_3150.jpeg
    320.1 KB · Views: 22
Last edited:
Day: Yet more fun! 🤩

Bag: D Rear Gearbox

(To be fair, I’ve heard some complaints about bag D and G online so I was almost looking for an issue). I had no issues. IMO, this was a really fast straightforward section. Maybe the concerns that I saw were related to a different model.

IMG_3155.jpeg


Again, good, simple to understand instructions!

IMG_3136.jpeg


Everything remains on par with quality! 😊

IMG_3138.jpeg


This went together really well. Unfortunately not much to say, it is what it is. 👍

Day 2 Fun, Fun, Fun and even more fun!

Bag E: Rear End Assembly

Now we’re getting into the stuff that I like!

IMG_3157.jpeg


Solid instructions! Lots of choices for inserts! Also, bits are starting to mate with other bits at this point with lots of adjustment points. You can really kind of start taking this in a few different directions from this point. I can see why people like these rigs. As I’m just building this for myself and I want to learn more, I’m going straight down the middle and sticking with the manufacturer recommendations.

IMG_3142.jpeg


Again, super nice quality! Big solid arms, nicely machined blocks and butter smooth fitment.


IMG_3143.jpeg


Rear End Assembly all nice and neat. Patiently waiting on my old a$# to keep moving.

Next up, Bag F
 
Last edited:
Day 3: Still fun, getting closer.🤗

Bag F: Rear Hub /Camber Links

IMG_3165.jpeg


IMG_3146.jpeg


Again, quality was on point! This went together really easy so I didn’t take many photos. Lots of insert options for the Arm and Hubs. Nice to be able to adjust straight away. Again, if you were going a specific direction with your build, man how nice to have that flexibility. 🥰
 
Day 3: Still fun, getting closer.🤗

Bag F: Rear Hub /Camber Links

View attachment 5374

View attachment 5373

Again, quality was on point! This went together really easy so I didn’t take many photos. Lots of insert options for the Arm and Hubs. Nice to be able to adjust straight away. Again, if you were going a specific direction with your build, man how nice to have that flexibility. 🥰
Oh yes - the overwhelming number of plastic pills for adjusting anti-squat, toe, kick-up etc....the joy of finding out which ones are which! 🤣

Your build thread is excellent, may I say. Your photography is on point, too.

Can't wait to see the shock build sequence. One thing I've always liked about Tekno truggies is the purposeful, large shocks. Decent length/travel to them. And springs that are actually made for them, rather than an inch too short that require all available preload. 👍😅

The Tekno manual looks excellent, too. 👍 Keep us posted.
 
Thanks H,

I was drooling over the shocks this morning already, fronts are complete but I still need to add the rear. Beefy, Big, lots of movement! Servo arrived along with the wheels but the esc, motor and tires aren’t scheduled until Tuesday so I’ll try to get caught up on the Bags and photos today. 👍
 
Day 3 Starting to look like something! 👀👀

Bag G: Front End Assembly


IMG_3153.jpeg


Again, nicely detailed and easy to comprehend.


IMG_3154.jpeg


Big Beefy Arms! Finely machined parts! What’s not to like! 😊

IMG_3159.jpeg


Everything went together well, it’s starting to look like something.

Bag H is coming up!
 
Bag H: Front Camber Links

&

Bag I: Steering Assembly


I kinda built these 2 at the same time. There’s not much to the Steering Assembly but I did like the fact that they tell you “Exactly” how to set the servo saver.

IMG_3197.jpeg


Again, super easy to understand! More choices for customization!

IMG_3198.jpeg


IMG_3199.jpeg


Steering set-ip is nice. And the fact that it came with the “extra” piece and then tell you to throw it away! Thats freakin epic! 😂😂😂😂😂 ☝️☝️☝️


IMG_3161.jpeg


Bag H and I

IMG_3163.jpeg


Again, everything went together easy and smoothly. Bag J will be finishing up the front end soon! 👍👍

IMG_3200.jpeg


Servo saver set point! ☝️☝️☝️

IMG_3170.jpeg
 
Day 3 Con’t. Finally it’s chassis time!

Bag J: Front End Assembly

IMG_3166.jpeg


Nice instructions. Again, important parts are highlighted.

IMG_3168.jpeg


Quality continues to amaze me! Everything is just so nice. I hope the pictures can do this justice.

IMG_3171.jpeg


Behold, the magnificent chunk of metal that I’ve been waiting to see!🤩🤩


IMG_3172.jpeg


There’s a peek at the underside as well!

I apologize, I lost my photo of the front mounted on the frame. Hold tight, the back end will be joining us in no time at all! 👍👍

Bag K, here I come! 🤤
 
This build isn't going to take you long at all! 👍 Mine was done with the odd hour here and there. Started on the 3/12/23 - finished on 12/12/23 - not that it mattered as the electronics took 2 months to arrive anyway...😝

These rigs are so nice to build.

I love the chassis - the Tekno looks so purposely designed. It's a tank!

Once I've moved house - I'm going to join you with an ET48 2.0. I've been eyeballing them at RPRC. They're down to £569, so maybe I'll get one on Black Friday. 🤩
 
Back
Top