Nelson.81
Well-known member
- Messages
- 1,266
- Reaction score
- 1,829
- Points
- 333
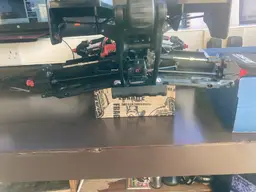
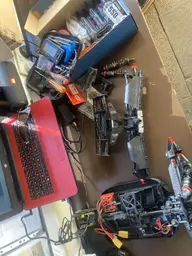
Picked up xtr not long ago been collecting up the parts for a off road truggy missile build I want to do, got most bits I want to make a start to it, still a more bits I want to add but they gonna have to wait for now.
Bits So far.
Hobbywing max 6 combo
Agfrc 45kg
Parts by Erik van Ravenstein
7075 Hinge holders, ABCD blocks
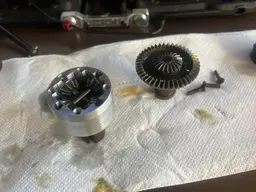
7075 diff cases
7075 diff mount inserts
Titanium steering Ackermann
gpm servo saver
Hpi heavy duty servo saver spring(unsure if this will fit still to try it out)
Full set of kagama arms including inserts (from jennysrc £35 shipped to uk )
)
Corally wheelie bar
Corally Hard springs
Corally graphite arm stiffeners
Corally rear cvds
Kagama rear mud guards
Shock cap protectors
Shock boots
46t spur.
Will be installing truggy wheels on it, have a set of vp pro bulldogs for now but will need belted so will be going for method rc terra forms or belted katars undecided yet.
Sworkz bruggy body still to paint up.
Have a spare Kronos body if anyone in need.
Enough to get the build started still few bits I’d like to add corally 7075 centre diff plate, chassis brace holders, vitavon diff cases & hubs & maybe titanium driveshafts but my wallet is tapped out for now .
.
Time to get the tools out.


Bits So far.
Hobbywing max 6 combo
Agfrc 45kg
Parts by Erik van Ravenstein
7075 Hinge holders, ABCD blocks
7075 diff cases
7075 diff mount inserts
Titanium steering Ackermann
gpm servo saver
Hpi heavy duty servo saver spring(unsure if this will fit still to try it out)
Full set of kagama arms including inserts (from jennysrc £35 shipped to uk
) Corally wheelie bar
Corally Hard springs
Corally graphite arm stiffeners
Corally rear cvds
Kagama rear mud guards
Shock cap protectors
Shock boots
46t spur.
Will be installing truggy wheels on it, have a set of vp pro bulldogs for now but will need belted so will be going for method rc terra forms or belted katars undecided yet.
Sworkz bruggy body still to paint up.
Have a spare Kronos body if anyone in need.
Enough to get the build started still few bits I’d like to add corally 7075 centre diff plate, chassis brace holders, vitavon diff cases & hubs & maybe titanium driveshafts but my wallet is tapped out for now
. Time to get the tools out.


 so don’t know what will be next on my shopping list. Might just leave the shiny bling bits to be added over the winter months.
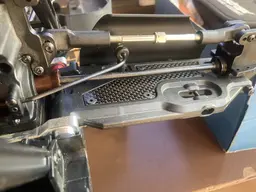
 . Then I spot my mistake, that resistance wasn’t being caused by the diff case, with my rig on the stand wheels off arms hanging down that last little bit of resistance I was feeling was the top Ackermann bar hitting the bottom of the kagama arms, once lifted or on wheels off the stand no issues
  I’m a silly bugger, but putting it down to me working on my rig after nights when to tired and head ready for bed, won’t do that again. But with all material removed gpm servo saver fitted but I still wasn’t happy with it, It just doesn't feel as free moving left/right as original & it’s using same bearings so
  put original back on with titanium Ackermann. Plenty have used gpm stuff not had issues but without being able measure it accurately I can’t say why caused me issue hitting diff case. Maybe get the corally one some point. The hpi servo spring was just to tight so to grinder to it also, much happier with it now and cutting it makes it a lot easier to fit as before it was a female dog to fit.

 .
.