Navigation
Install the app
How to install the app on iOS
Follow along with the video below to see how to install our site as a web app on your home screen.
Note: This feature may not be available in some browsers.
More options
Style variation
You are using an out of date browser. It may not display this or other websites correctly.
You should upgrade or use an alternative browser.
You should upgrade or use an alternative browser.
Asuga How do I change this front wheel hub
- Thread starter ian986
- Start date
This site may earn a commission from merchant affiliate
links, including eBay, Amazon, and others.
links, including eBay, Amazon, and others.
")
Horatio
Well-known member
- Messages
- 2,553
- Reaction score
- 3,445
- Points
- 458
Can have anyone explain how to change the front wheel hub as I lost a wheel today.
Got some new wheels to put on and don't want to mess them up as hub is starting to round off.
Thank you
View attachment 4887
- Disconnect steering track rod from front hub carrier
- Remove 17mm hex by unscrewing grub screw C 3004 40 04 from axle and removing the pin
- Remove both the pillow ball adjusters and plastic bushes from the hub carier
- Remove both pillow balls from upper and lower suspension arms
- Remove hub carrier
Horatio
Well-known member
- Messages
- 2,553
- Reaction score
- 3,445
- Points
- 458
If you're only removing the hex, you only need to follow the second step - I thought you were replacing the hub carrier as well.Horatio thank you so much for your help

ian986
Well-known member
- Messages
- 124
- Reaction score
- 145
- Points
- 198
- Thread starter
- #5
Yes I am getting very frustrated with this seems stuck on and worried I am going to round off nut inside even using the conrally tools still can’t undo nut in middle of hex
You can just do that by undoing the grub screw in hex then knocking the pin out no need to remove pillow bolts ?
Thanks again
You can just do that by undoing the grub screw in hex then knocking the pin out no need to remove pillow bolts ?
Thanks again
ian986
Well-known member
- Messages
- 124
- Reaction score
- 145
- Points
- 198
- Thread starter
- #6
I took the rear one off no problem but front one is very stuck to point now grub screw is rounding off I thought if I tightened it might break thread lock on it! I did managed to tighten a bit but can’t undo aggggghhhhh
Horatio
Well-known member
- Messages
- 2,553
- Reaction score
- 3,445
- Points
- 458
They can be very tight and you need good precision tips on your hex drivers. You may need to heat it with a soldering iron - just be careful not to melt any nearby plastic. Heat usually helps.I took the rear one off no problem but front one is very stuck to point now grub screw is rounding off I thought if I tightened it might break thread lock on it! I did managed to tighten a bit but can’t undo aggggghhhhh
If that fails, the only way to remove the grub screw will be to drill it out, which is a pita.
What drivers are you using?
Jeffwazz
Well-known member
- Messages
- 381
- Reaction score
- 695
- Points
- 248
Some threadloc is just 
Heat (a small butane torch (Lidl special), as I couldn't get enough heat into it with the soldering iron) and well fitting hex tools are a must.
If the worst happens and it does round off, a Torx bit knocked into the hex will sometimes work.
Otherwise it's a world of pain with drill bits and easy-outs.
ian986
Well-known member
- Messages
- 124
- Reaction score
- 145
- Points
- 198
- Thread starter
- #9
I have just bought the Team Corally tool Kit as I had some from Amazon. I thought these would be better. I might enlist the help of one if my friends because this is way above my skill level. I will have to get another grub screw which I won't have I only did an today ordered a new pair of wheels which are arriving tomorrow because one of my wheels broke and it looked like it might snow today, I was hoping to have some fun in the snow next couple of days
Horatio
Well-known member
- Messages
- 2,553
- Reaction score
- 3,445
- Points
- 458
Good luck bud. You never know - you might get it sorted in time.I have just bought the Team Corally tool Kit as I had some from Amazon. I thought these would be better. I might enlist the help of one if my friends because this is way above my skill level. I will have to get another grub screw which I won't have I only did an today ordered a new pair of wheels which are arriving tomorrow because one of my wheels broke and it looked like it might snow today, I was hoping to have some fun in the snow next couple of days
 Driving in the snow is a lot of fun, but it's rare these days!
KnowAir
Well-known member
I understand you're frustrations!! Those grub screws can be a real PIA!! The first order is proper tools, sounds like you have that. Second, heat. Threadlocker always releases easier with heat. Pencil tip soldering iron is my choice, but you can use a micro torch. Possibly even use a standard L-key wrench. Install the L key into the screw, hold in place with pliers, and apply heat to the L wrench with a torch. This will transfer heat to the grub screw, less effective or safe I suppose though. My last resort is to force the pin out of the hex adapter and axle with an appropriate sized punch and hammer. Place a socket under the hex adapter and carefully hammer the pin out. Once apart, you can remove the cvd/axle from the plastic hub and really get to it with the heat, drill, extracter, torx bit, or whatever you want to try.
I have actually started replacing those blasted grub screws with socket head cap screws, just to avoid this whole problem.. this gives me a locking screw that uses a 3mm hex bit so I can really apply as much torque as I may need to remove if they get rusted in. Which is what typically happens to the grub screws. Also, because the grub is so deep in the threads, dirt and rust can build up outside making them even harder to remove.


I have actually started replacing those blasted grub screws with socket head cap screws, just to avoid this whole problem.. this gives me a locking screw that uses a 3mm hex bit so I can really apply as much torque as I may need to remove if they get rusted in. Which is what typically happens to the grub screws. Also, because the grub is so deep in the threads, dirt and rust can build up outside making them even harder to remove.
Horatio
Well-known member
- Messages
- 2,553
- Reaction score
- 3,445
- Points
- 458
That's a great idea - I like that!I understand you're frustrations!! Those grub screws can be a real PIA!! The first order is proper tools, sounds like you have that. Second, heat. Threadlocker always releases easier with heat. Pencil tip soldering iron is my choice, but you can use a micro torch. Possibly even use a standard L-key wrench. Install the L key into the screw, hold in place with pliers, and apply heat to the L wrench with a torch. This will transfer heat to the grub screw, less effective or safe I suppose though. My last resort is to force the pin out of the hex adapter and axle with an appropriate sized punch and hammer. Place a socket under the hex adapter and carefully hammer the pin out. Once apart, you can remove the cvd/axle from the plastic hub and really get to it with the heat, drill, extracter, torx bit, or whatever you want to try.
I have actually started replacing those blasted grub screws with socket head cap screws, just to avoid this whole problem.. this gives me a locking screw that uses a 3mm hex bit so I can really apply as much torque as I may need to remove if they get rusted in. Which is what typically happens to the grub screws. Also, because the grub is so deep in the threads, dirt and rust can build up outside making them even harder to remove.
View attachment 4896
View attachment 4897

ian986
Well-known member
- Messages
- 124
- Reaction score
- 145
- Points
- 198
- Thread starter
- #14
KnowAir thank you for the tips.
I wish I had seen your post earlier I spent the afternoon trying to find a grubs screws to fit! a cycle shop had some thing. if I ever manage to get the old one out.The other's I got out quite easily, so sods law the one i need to replace I can't! but I think your idea of the socket head screws is fantastic, can you remember which size your purchased?
I love those wheels which brand are they?
KnowAir
Well-known member
Losi XXT.KnowAir thank you for the tips.
I wish I had seen your post earlier I spent the afternoon trying to find a grubs screws to fit! a cycle shop had some thing. if I ever manage to get the old one out.The other's I got out quite easily, so sods law the one i need to replace I can't! but I think your idea of the socket head screws is fantastic, can you remember which size your purchased?
I love those wheels which brand are they?
Horatio
Well-known member
- Messages
- 2,553
- Reaction score
- 3,445
- Points
- 458
KnowAir thank you for the tips.
I wish I had seen your post earlier I spent the afternoon trying to find a grubs screws to fit! a cycle shop had some thing. if I ever manage to get the old one out.The other's I got out quite easily, so sods law the one i need to replace I can't! but I think your idea of the socket head screws is fantastic, can you remember which size your purchased?
I love those wheels which brand are they?
KnowAir
Well-known member
Look's like TC uses m4 grub screws, so say maybe 4mm x 12mm socket head hex cap screws (SHCS)? The length isn't very critical, the aluminum hub adapter slides right over the screw. I have bins of screws, not sure what the actual length I used is. I also have quite a few different brands of rc's that use the same basic setup but some use different sized screws from TC. IIRC, a 4mm SHCS should use a 3mm hex bit size tip.
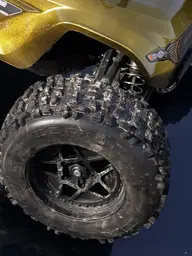
Here's another example, this is my TC Kronos after a fresh new body and tires were installed.
I like the fact that the threads of the axle are filled by the screws. Helps prevent the dirt from clogging up the threads of the axles.
I don't take these apart often either, routine maintenance will definitely help. I guess I'm a bit lax in that regard.
Attachments
Last edited:
ian986
Well-known member
- Messages
- 124
- Reaction score
- 145
- Points
- 198
- Thread starter
- #19
Well the bolt is finally out ") I took to my cousins house he used to be a car mechanic, he hammered in a allen key but and he managed to get out put new grub screw in with the finest bit of thread lock.
I took to my cousins house he used to be a car mechanic, he hammered in a allen key but and he managed to get out put new grub screw in with the finest bit of thread lock.
Just need the rain to stop, so can try it out. Managed to take some the play out in the steering too.
I took to my cousins house he used to be a car mechanic, he hammered in a allen key but and he managed to get out put new grub screw in with the finest bit of thread lock.Just need the rain to stop, so can try it out. Managed to take some the play out in the steering too.